As a preface
In the modern world, it is rare to encounter purely clean malware during analysis. Malware code is commonly modified to hinder researchers from analyzing and decompiling it.
Software that alters code to hinder analysis is known as obfuscators. Some are designed to mutate machine code, targeting malware primarily developed using C/Asm/Rust, while others modify IL (Intermediate Language) code generated by .NET compilers.
This series of articles will delve into modern techniques employed by obfuscators like .NET Reactor and SmartAssembly, which are widely favored by malware creators. We will acquaint ourselves with deobfuscation methods and attempt to either develop our own deobfuscators or adapt existing ones. We will also explore tools designed to counter them if any.
Our goal is to make the content as accessible as possible, ensuring that even beginners with a basic understanding of .NET can grasp the concepts. However, a foundational knowledge of malware analysis tools and concepts is expected. Prior experience in analyzing obfuscated code will be an added advantage.
Are you ready to embark on this journey? Let’s begin.
Introduction
To truly understand obfuscators, we should think like the people who make them. It’s a bit like the red/blue-team in cybersecurity: to defend well, you must understand the offense. So, let’s try our hand at building a simple obfuscator.
1 Simple obfuscator
1.1 What should it look like?
First of all, let’s look at the program we will be experimenting with:
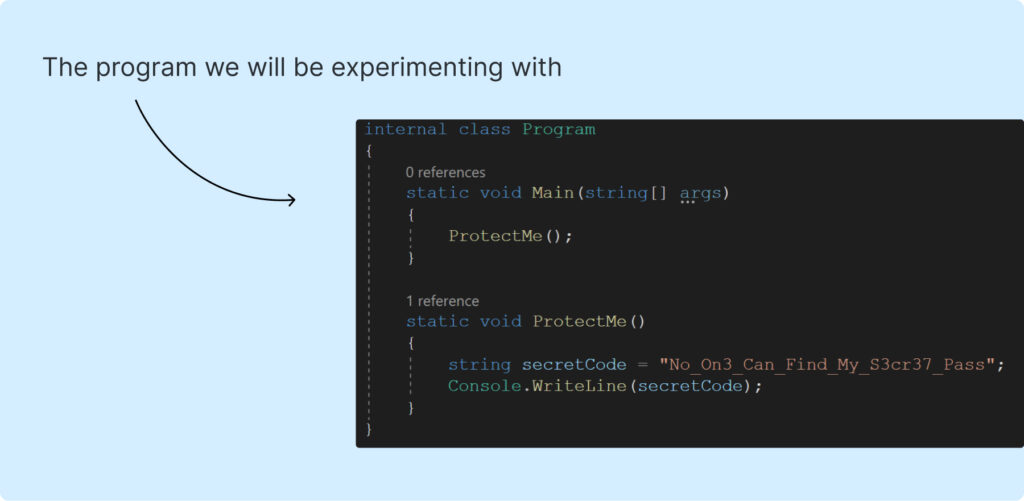 Source code of the “Example1”
 Yep, there are a few lines of code, one variable and it has the only function “ProtectMe” which prints “No_On3_Can_Find_My_S3cr37_Pass”. So simple, isn’t it?
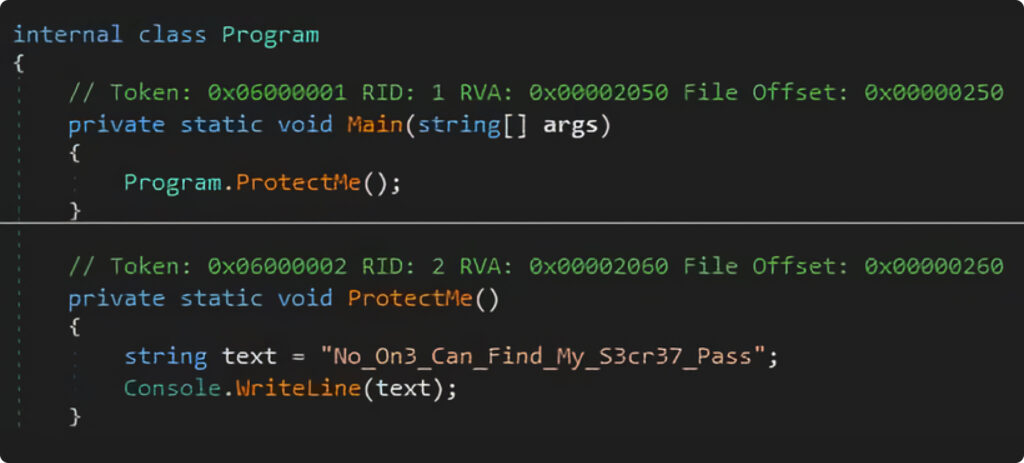
Take a look at the decompiled code in the .NET debugger “DnSpy”:
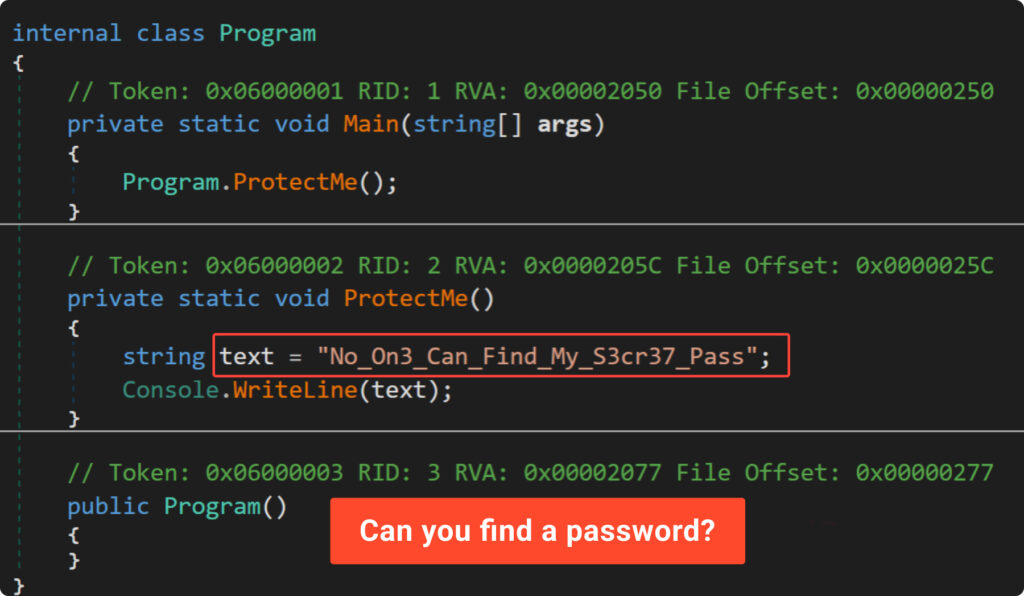 Decompiled code of the “Example1” in DnSpy
 It’s clear that anyone can easily find the password by opening the compiled program in the appropriate tool, without much effort. So, how to protect our password?
Here are some strategies we will use to enhance protection of our secret:
- proxy functions: put each static string in its own function with crazy name;
- character breakdown: divide strings into individual characters;
- numeric conversion: replace characters with their numeric values;
- heavy math: use many math operations with large numbers;
- CFG obfuscation: make the control flow complex and hard to follow.
Let’s see if these methods can really keep our secret safe and make it tough for anyone trying to crack it.
Analyze obfuscated malware with ANY.RUN’s advanced features
Get trial1.2 Proxy Functions
Following our strategy, we’ll move all string assignments into separate functions (proxy). This step gives us better control over these individual functions and forces researchers to search elsewhere for the definition of each string.
The desired outcome of our approach is showcased in the Example2 decompiled listing:
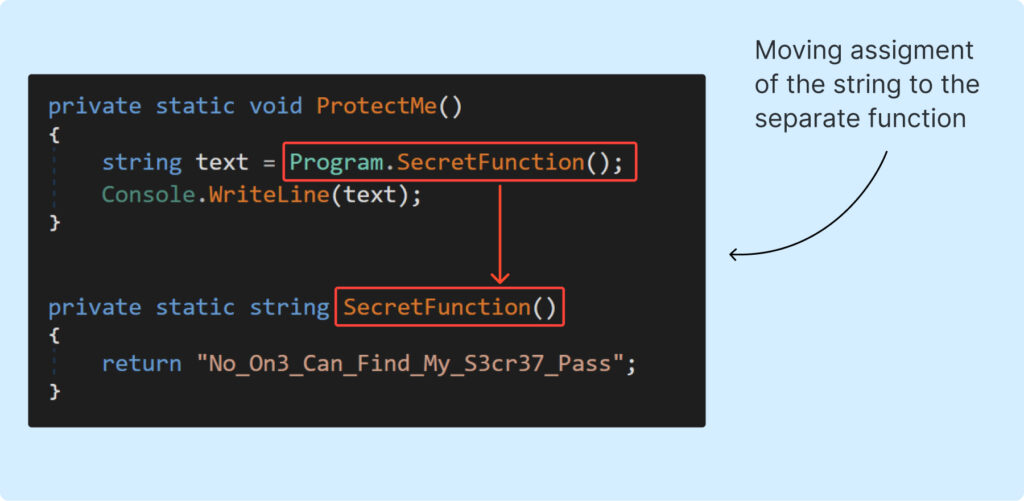 String assigment in the separate function
 To achieve this, we’ll need to modify the IL code. We can see how it should be changed in the following picture (change view to “IL with C#” in DnSpy):
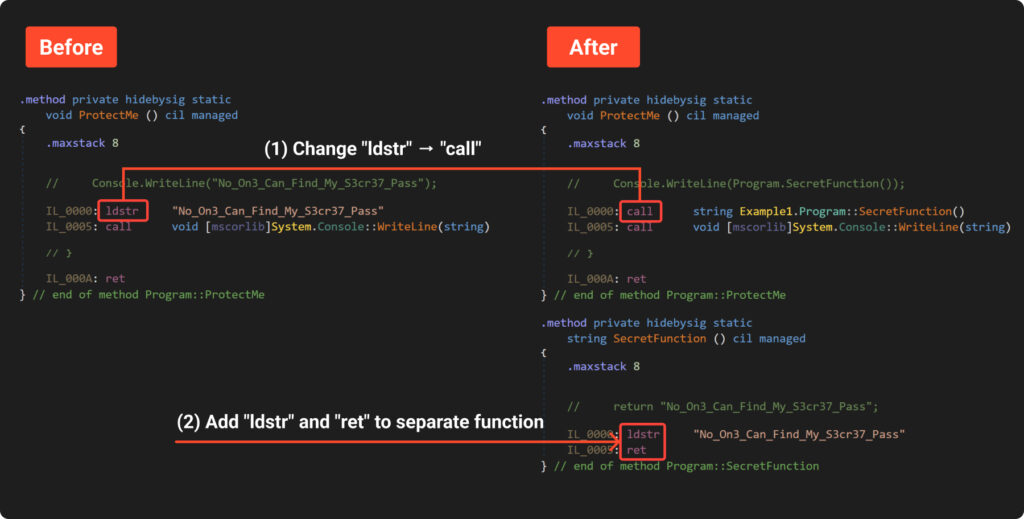 IL code modifications at the first iteration
We use “Dnlib” library to make changes to the compiled “Example1”. This process needs to be done in several steps:
- Locate function “ProtectMe”.
- Go through all the instructions and find each instance of “ldstr” (load string).
- Create a new class and a new function with a random name.
- Add “ldstr” and “ret” instructions to the body of the created function.
- Replace original “ldstr” with a call to the new function.
All the steps mentioned above have been implemented in Example3. We won’t go into a detailed analysis of the source code here, because it is a bit boring and you can do that on your own. However, we will point out two interesting aspects.
First, take a look at how simply and elegantly we can create the body of a new method using ‘dnlib’:
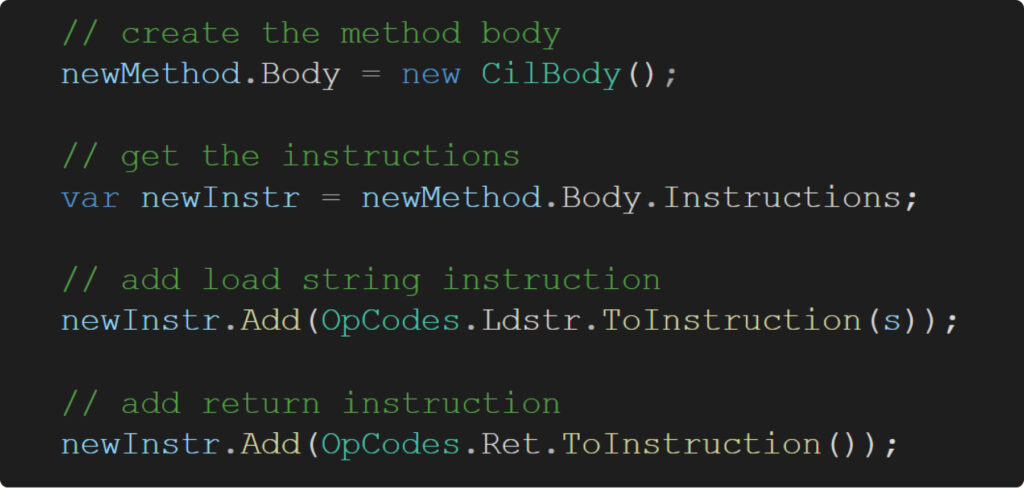 IL code modifications at the first iteration
 Second, consider how random function names should appear. Do they need to consist solely of printable characters? Absolutely not. To really make the researcher’s job challenging, we switch to using UTF-32 encoding!
Well, let’s see what we’ve got:
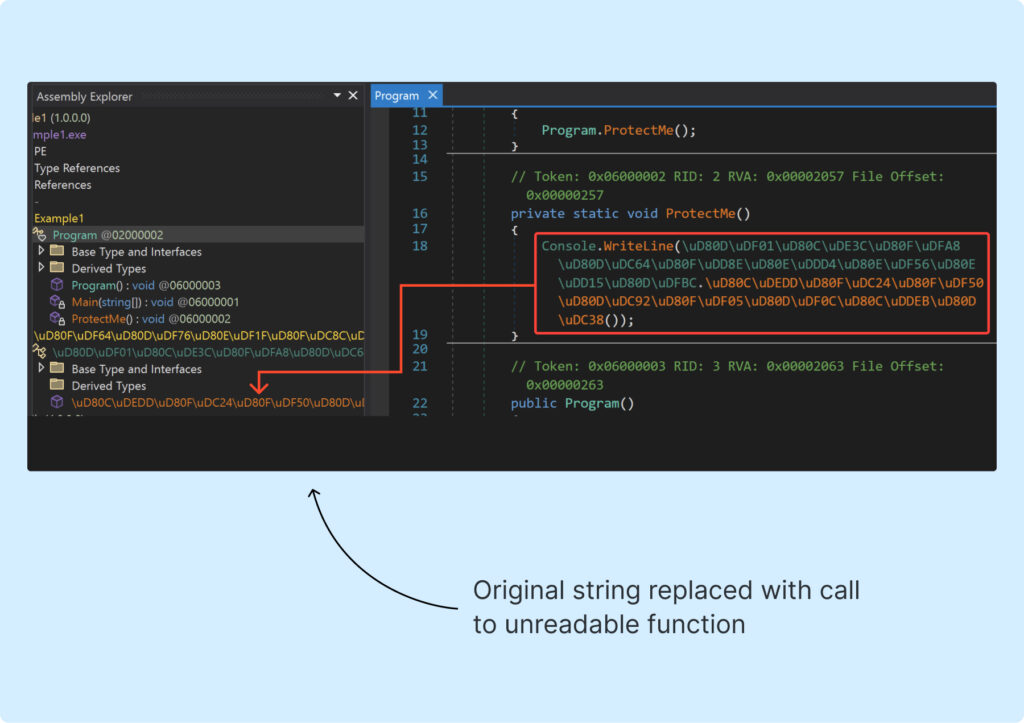 The result of the 1st obfuscation step
 It looks pretty scary, right? We can see that the original string is now hidden behind a call to a really annoying method. Now, it’s time to move on to the next part.
1.3 Character breakdown
Even though we’ve hidden the original string, it’s still pretty easy to find and read it. To fix this, we need to change the secret itself. So, we split the secret into individual characters which allows us to shuffle their order later and present the code in a form that’s much harder to read.
First, check out decompiled code of the Example4, where you can see what we’re aiming for:
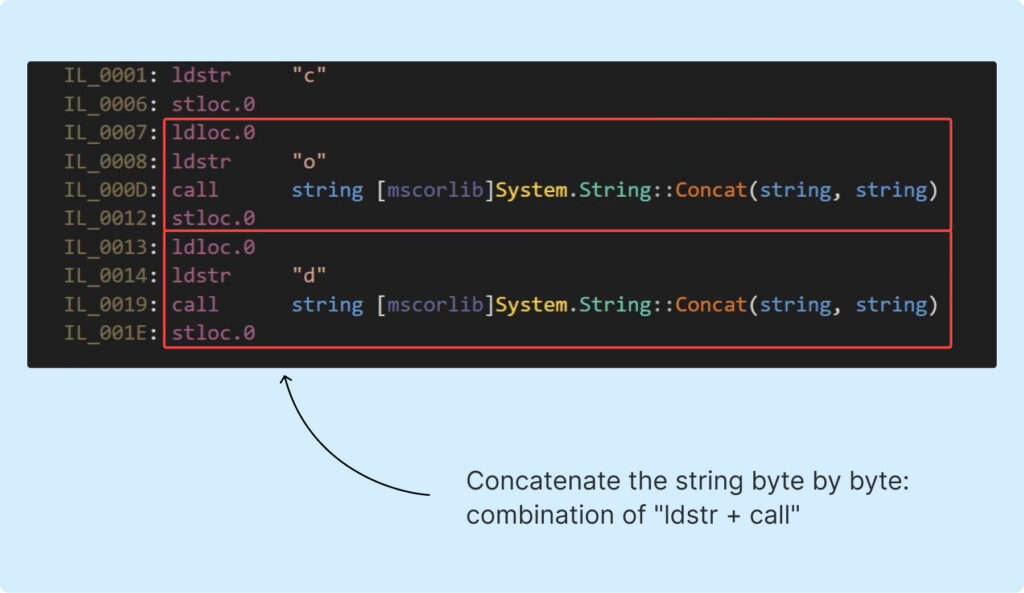 IL code of the splitted string
 The screenshot above demonstrates that the string is pushed onto the stack byte by byte, unlike in the previous examples where the entire string was pushed at once.
Second, take a look at Example5, where we’ve made a small change to our obfuscator by adding the function “SplitStringByCharToInstr.” This function splits string and generates corresponding IL code. The result of the improvement outlined in the next screenshot:
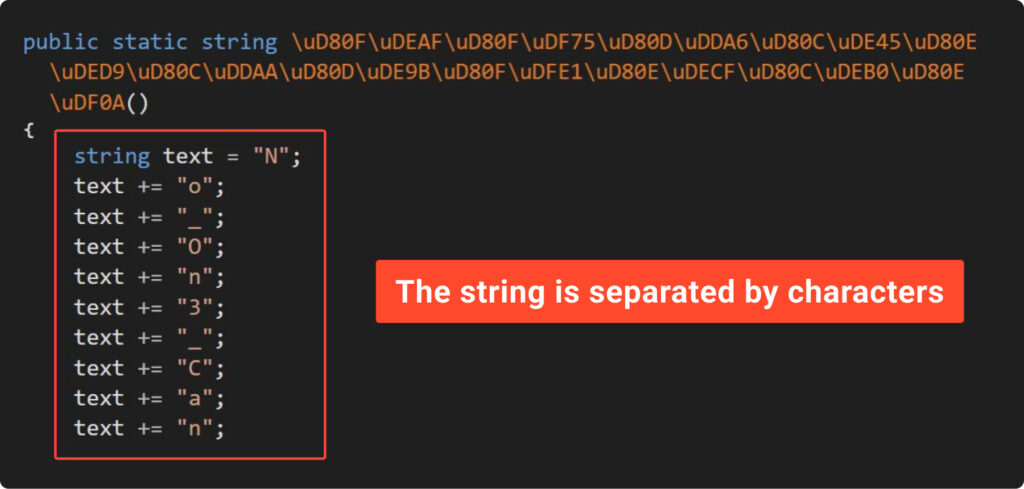 Constructing string by bytes
 It appears that DnSpy is powerful enough to parse IL code and present splitted string in a human-readable form. We’ll delve into this in the next chapters. For now, we examine this improvement from another perspective.
Let’s compare the output of the “string” command before and after obfuscation:
 The entire string is missing from the file
Here we are! The string has vanished from the file. It might be a good example of how obfuscators can help bypass signature detection.
Now, let’s move on and tackle the almighty DnSpy.
Get a personal demo of ANY.RUN from our team
Get demo1.4 Numeric conversion
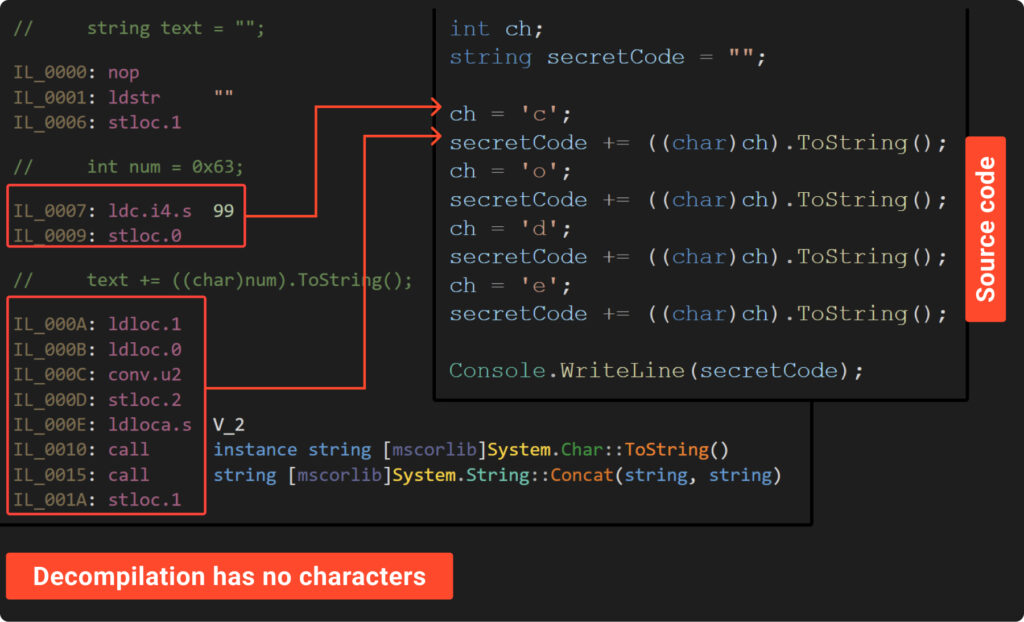
So far, our attempts to hide the password haven’t really paid off. But what if we replace the symbols with their numerical representations? Let’s take a look at Example6 to see this approach in action:
 Numeric conversion in action
The source and decompiled code above shows that there are no characters visible, showcasing the effectiveness of this method. In this approach, each character is represented by a number, which the “Conv.U2” instruction converts to an unsigned int. Subsequently, we convert this number back to a string and append it to the final result.
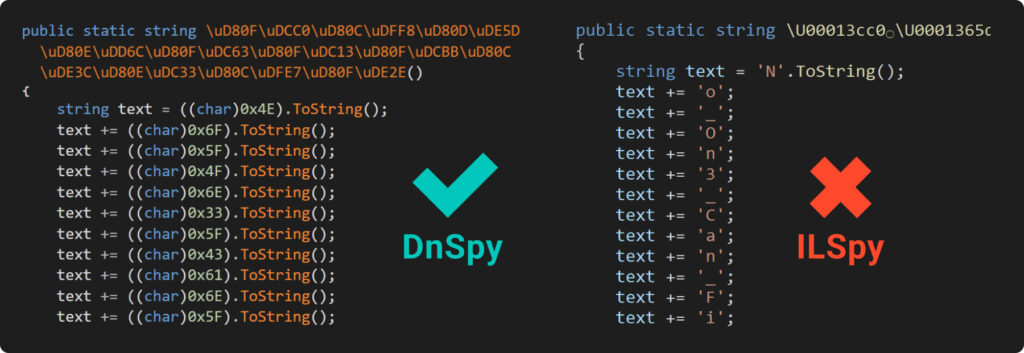
To utilize this technique, we need to tweak our obfuscator slightly. The result of modification is showcased in the Example 7, where we’ve integrated the function “MaskCharsWithNumVal” to perform this conversion. The next picture shows the result:
 Numeric conversion defeated DnSpy, but failed with IlSpy
The image we’re looking at shows that trying to read the code decompiled by DnSpy can be a bit of a headache. It turns everything into numbers, and you’d have to use the ASCII table to make sense of it – definitely a bit of a hassle if you’re doing it manually.
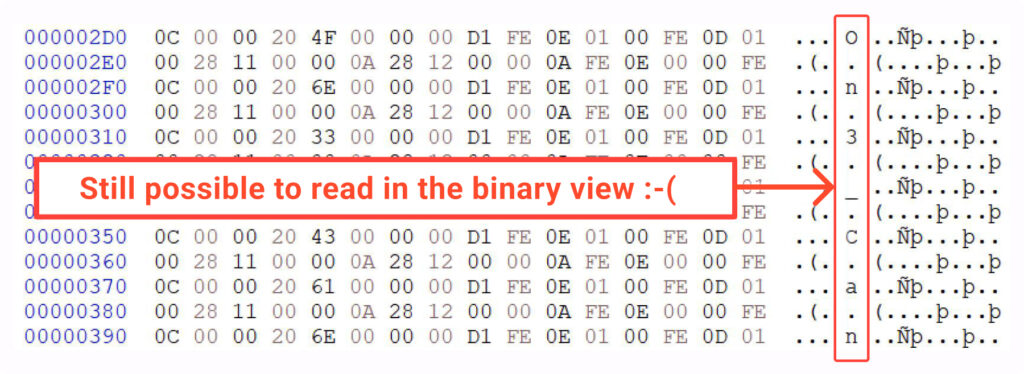
On the other hand, IlSpy, which is another great tool for breaking down IL code, does a pretty neat job. It seems to catch onto our trick and changes those numbers back into characters, making them easy to read. Also, if you peek at the file’s binary view, you’ll find that our secret is still in there, just a bit more scattered around:
 Find a password in the binary view
Now, let’s move on to the next chapter where we completely wipe out any traces of the characters.
1.5 Heavy math
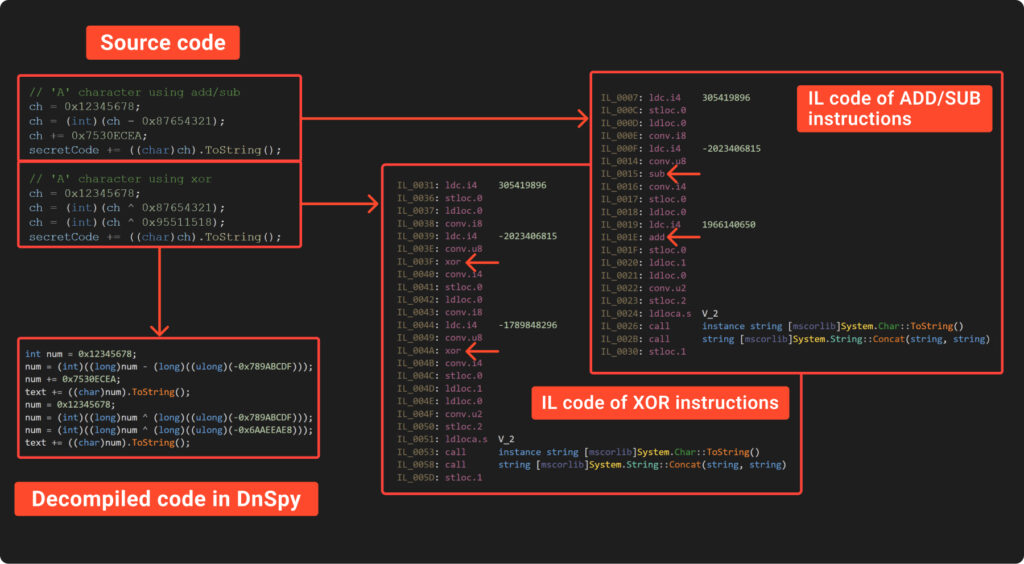
To begin with, take a look at the following math expressions:
 Transform characters to the math expressions
 Both expressions of the above shows the numeric representation of the ‘A’ character. Furthermore, it demonstrates that any number can be written as a mathematical expression. Even better, there are countless ways to express any number this way. So, why not get creative and represent our characters using randomly generated mathematical expressions?
Just like we did earlier, let’s now take a look at Example8 to see the expected outcome:
 Example of the IL code of the mathematical expressions
Decompiled code looks ugly, isn’t it? This is exactly what we need!
So, we should develop a function that requires two arguments:
- the target number we want to achieve;
- the intensity – the maximum number of ADD/SUB/XOR operations we can use to reach the target number.
The function will iterate through all the method’s instructions and modify those that involve an ‘int32’ number, replacing them with a new set of obfuscated instructions. Additionally, all numbers as well as mathematical operations should be generated randomly.
The modified version of the obfuscator, tailored to meet the above requirements, is displayed in Example9. Let’s also check out the results of its execution:
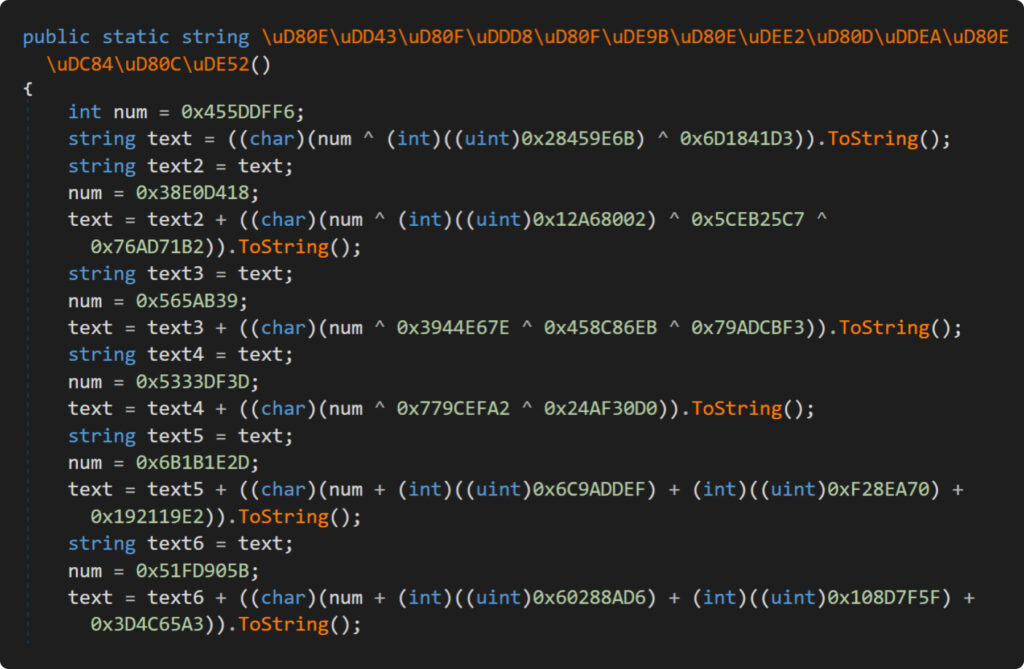 The result of the heavy math obfuscation pass
Here we are! Can you decipher the content in the screenshot above? Let’s share a few thoughts about the tweaks we made to the obfuscator.
First up, keen readers might notice that we didn’t mix XOR with ADD/SUB operations. This is due to the more complex logic needed because of their expression priority. We actually randomly pick which operation to use for each number.
Next, we employed a neat trick with a temporary variable to outsmart IlSpy. We first stored the initial random value in this temp variable before calculating the math expression. This step is crucial because IlSpy has a slick math synthesizer that instantly computes the result of mathematical operations between constant values. So, without this trick, the decompiled code would have directly revealed the character we were trying to hide.
Lastly, we added a bit of a twist by randomly converting from ‘int’ to ‘uint’. This small change is just enough to make curious researchers even more angry.
Despite the password now being harder to decipher, our decompiled code remains linear and could still be read with some effort. So, let’s step it up and add another layer of obfuscation.
1.6 CFG obfuscation
In simple terms, all Control Flow Graph (CFG) obfuscation boils down to:
- splitting the code into basic blocks;
- shuffling them randomly;
- connecting these blocks so that the result of executing the code remains the same.
To grasp the idea of breaking code into basic blocks, let’s revisit Example4. We’ll break the code down into basic blocks, shuffle them around, and then take a look at what happens in the image that follows:
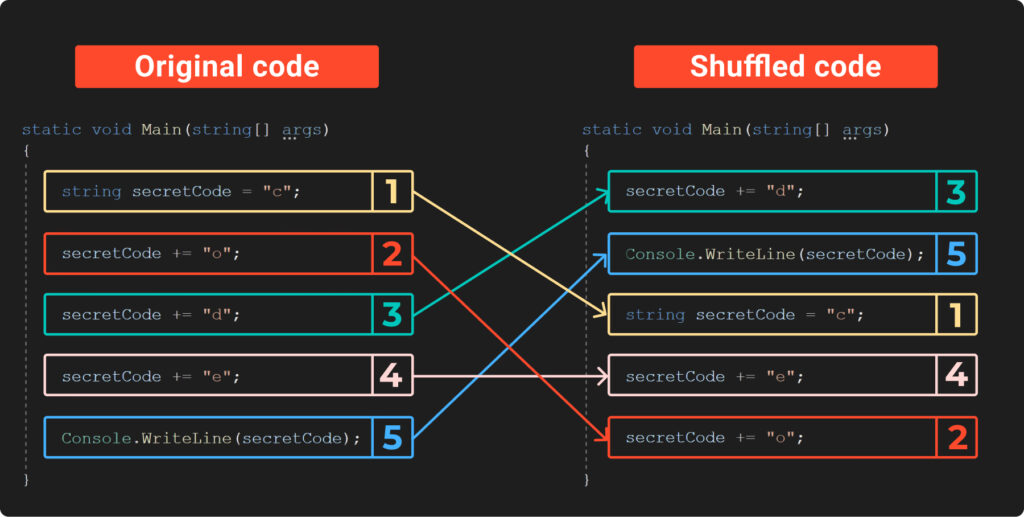 Example of splitting and mixing basic blocks
The previous image illustrates how shuffling the code makes it much tougher to spot the secret code. However, there’s a clear catch: if we try running this new, shuffled code, we’ll end up with the wrong secret, since the instructions are now in an incorrect order. So, how can we run them in the right way?
To execute shuffled code in the correct order, we need a way to guide its execution. This involves reconstructing the original control flow by adding control structures or markers. Take a look at the next image, where we’ve analyzed Example10:
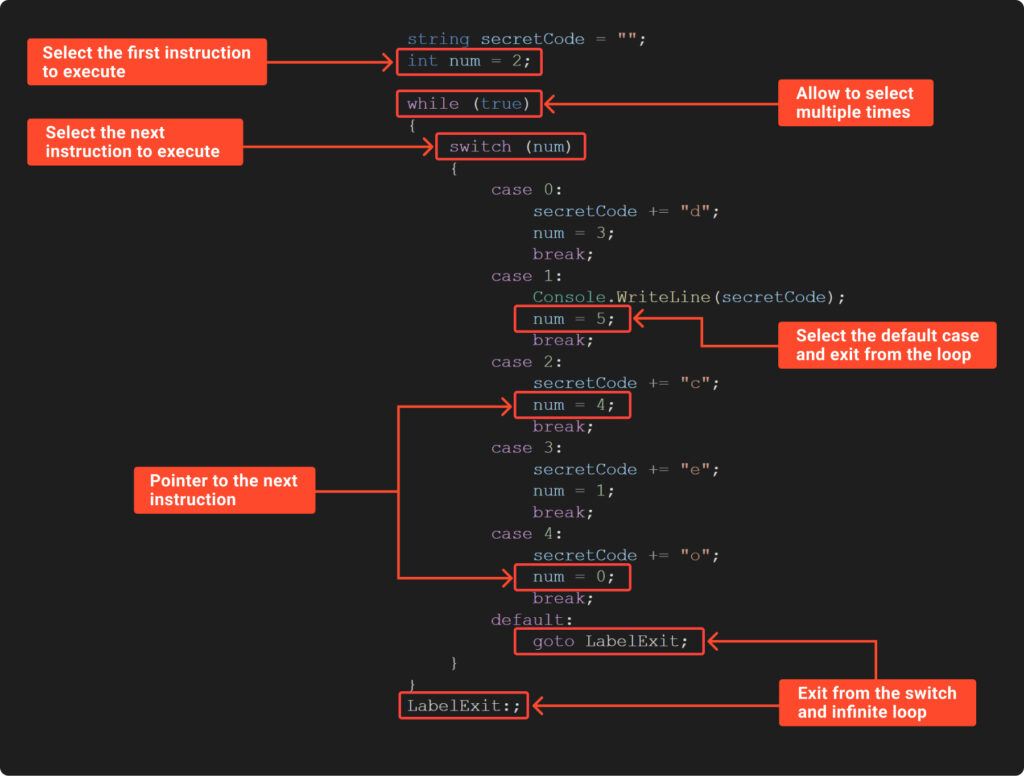 Example of control structure and markers to guide control flow
 The example above demonstrates a method for directing the execution of shuffled code. It features:
- an endless ‘while’ loop, which continuously moves us to the ‘switch’;
- a ‘switch’ statement that directly chooses the subsequent code block;
- the ‘num’ variable, acting as a marker, holds the choice for the start and the next block;
- a default case in the ‘switch’ statement, which serves to exit the endless loop.
It looks like we’ve successfully split the code into basic blocks and shuffled them. We’ve also learned how to direct the execution using a switch statement and a marker. But we need to remember that we’re working with IL, not the source code. Now, the question arises: how do we split the IL code into basic blocks?
As far as we know the IL virtual machine uses evaluation stack to operate. This means that before performing an operation, we first need to push the necessary values onto the stack. For instance, to execute a XOR operation, we push two values onto the stack, carry out the XOR, and then push the result back to the top of the stack.
Taking the above into account, we can broadly state that the initial state of the stack is empty, meaning the stack pointer is null. During an operation, the stack pointer changes from this initial state, becoming non-null. Once the operation is completed and the result is saved, the stack reverts to its initial null state. Therefore, it seems we can split IL code into basic blocks based on the initial stack value, specifically at points where the stack pointer is null.
Let’s examine the IL code from our latest obfuscated example. Here, we’ve divided the instructions based on the stack value:
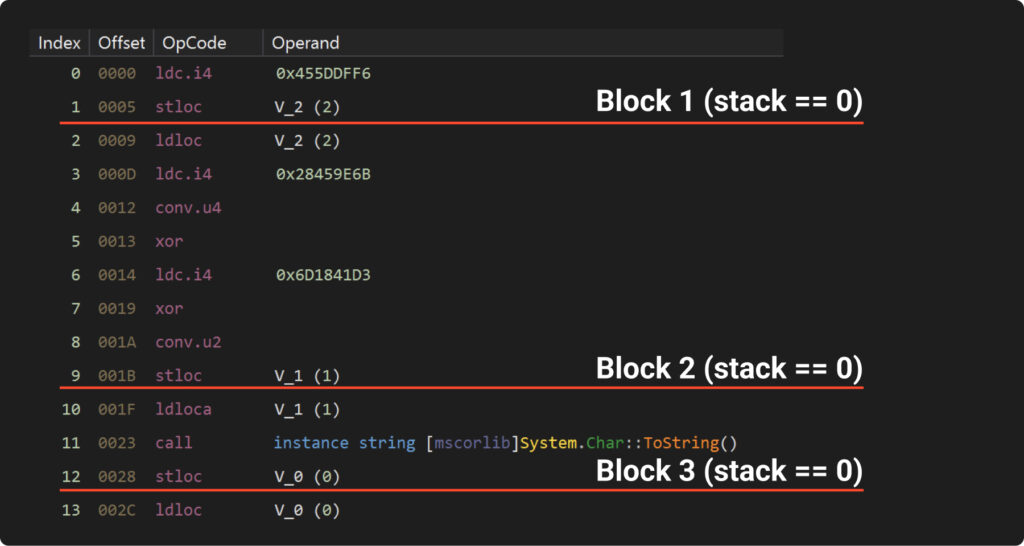 Example of splitting IL instructions into the basic blocks based on the stack value
 It’s important to note that the blocks doesn’t necessarily corresponds neatly into lines. It’s entirely possible for a single line of decompiled code to contain several basic blocks like in the next example:
 Two lines of the decompiled code corresponds to the three basic blocks (see previous picture)
With everything we’ve discussed so far, we’re now prepared to develop a CF obfuscator. This has been accomplished in Example11. The outcome of its execution can be seen in the following picture:
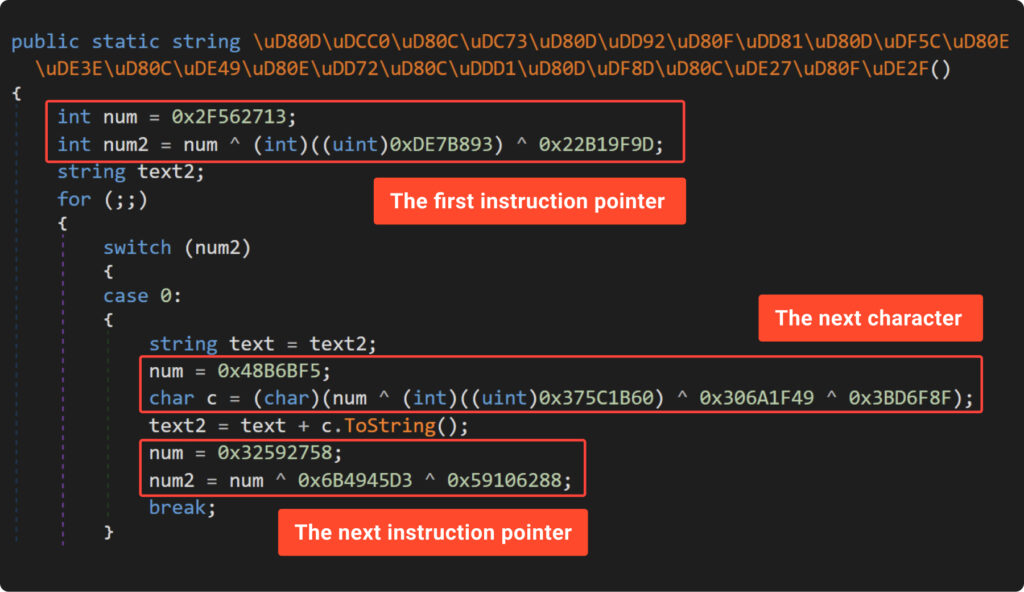 The result of the control flow obfuscation
We’ll leave the detailed code analysis of the Example11 to you as a home exercise. However, let’s highlight a key caution to consider.
The CF obfuscation we’ve presented is quite basic. It doesn’t account for exception blocks, prefixes, or conditional expressions. In fact, it overlooks many aspects. The aim was solely to demonstrate how it works in a straightforward manner. Consequently, it’s highly probable that this approach won’t function effectively with complex methods and would require more sophisticated development.
2 Attacking the simple obfuscator
2.1 Breakpoint
We’ve put in a lot of effort to conceal our secret from analysis and intimidate researchers with convoluted code. We even managed to some extent, creating a method laden with complex math and obfuscated control flow.
Yet, all our endeavors to establish ‘strong’ protection falter in the face of real-time execution. To bypass our safeguards, one simply needs to set a breakpoint at the return or after the function of interest and read its result, as shown in the following picture:
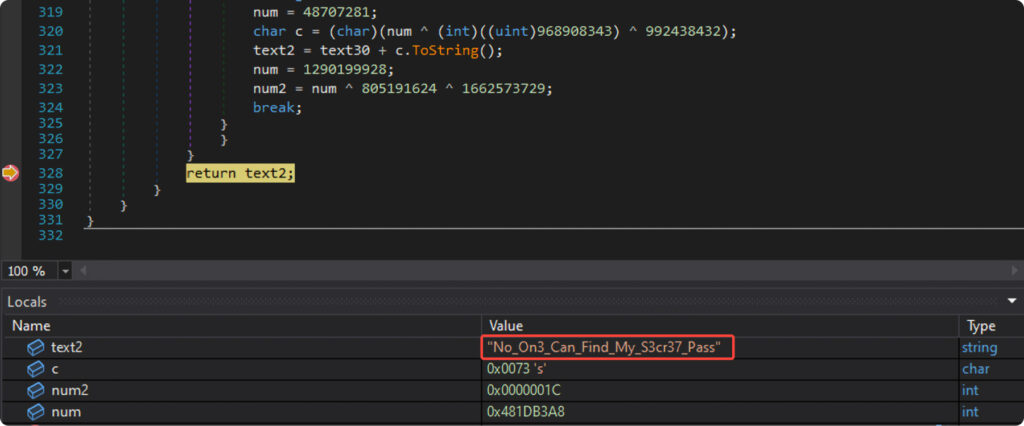 The epic fall of the obfuscator with a single breakpoint
 2.2 Memory dump
Memory dumps are among the most effective methods for uncovering hidden strings, as .NET compilers often leave numerous traces of the strings they decrypt. This is evidenced by the results of a memory scan using ProcessHacker, which revealed 24 results:
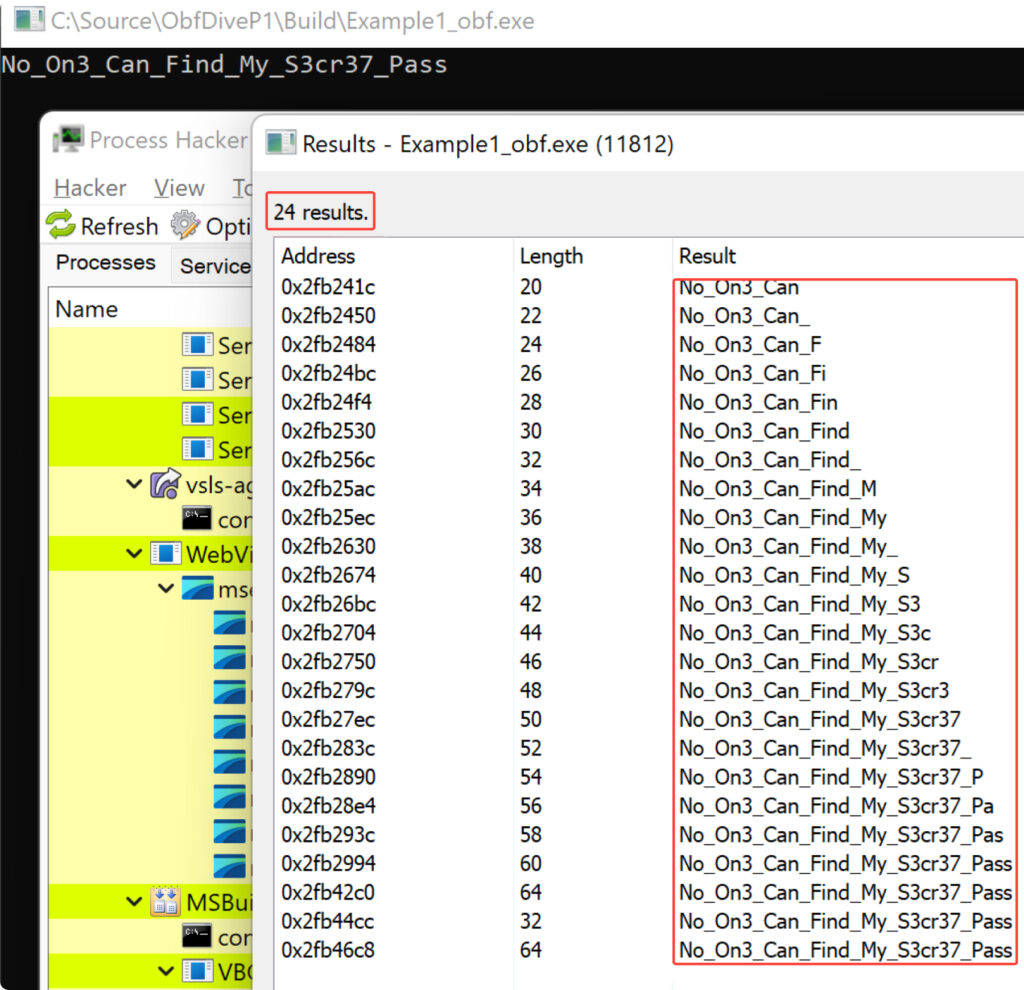 Memory dump shows our secret
 2.3 The De4dot
Our old friend ‘De4dot’ can still come in handy. With just a ‘one click’, it managed to completely remove the CFG and math obfuscation:
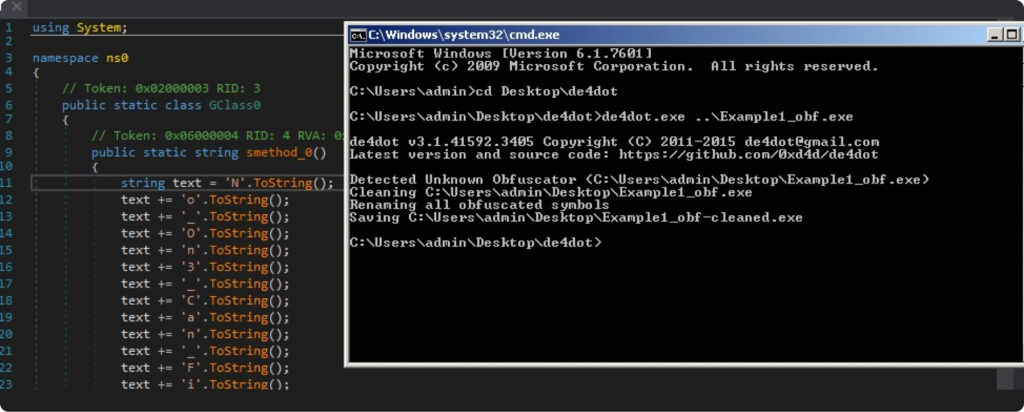 Old De4dot successfully deobfuscated the code
 Besides that, it also offers another powerful feature which directly executes the obfuscated method and replaces proxy call with a string literal:
> de4dot.exe Example1_obf.exe --strtyp emulate --strtok 0x06000004 The result, unfortunately for our obfuscator, is amazing:
 De4dot replaced a proxy call with a string literal
 Final thoughts
In this part of our article series, we developed our own simple obfuscator and then completely dismantled its concept using various attack techniques. Does this mean a simple obfuscator is inherently weak? To some extent, yes. But does this imply the techniques we used are obsolete and should be discarded? Absolutely not. These methods are still employed in modern obfuscators, albeit in more sophisticated forms. Does this mean we now have a better understanding of the most common obfuscation techniques and are prepared to dissect modern obfuscators to their core? That’s absolutely true. We’re now equipped and ready to delve into the world of obfuscators.
In the upcoming Part 2, we’ll explore more ways to protect code. We’ll investigate how obfuscators counter breakpoints, De4dot, and memory dumps. We’ll also examine how to penetrate their defenses to understand the code and many other intriguing aspects.
Stay tuned for the next part!
About ANY.RUN
ANY.RUN is a provider of a cloud-based sandbox for advanced malware analysis. The service is used by a community of over 300,000 SOC and DFIR professionals around the globe. The sandbox receives over 10,000 daily submissions of files and links, analyzing them and generating threat information reports.
Request a demo today and enjoy 14 days of free access to ANY.RUN’s top plan.
The post A deep dive into .NET malware obfuscators: <br> Part 1 appeared first on ANY.RUN's Cybersecurity Blog.
Article Link: A deep dive into .NET malware obfuscators: Part 1 - ANY.RUN's Cybersecurity Blog
1 post - 1 participant
Malware Analysis, News and Indicators - Latest topics


Post a Comment
Post a Comment